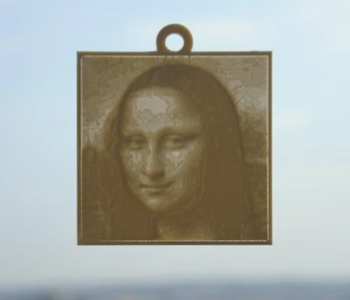
Lithophanes have become quite popular in recent months, particularly as gifts during the holiday season. Lithophanes also make great use cases for 3D printers because of easy they are to make and how appealing they are to many people.
If you’re still new to 3D printing lithophanes, it might take some time before you get to print one perfectly. However, you don’t have to go through all that wasted time and filament. Check out our guide on perfecting your lithophane technique with the best slicer settings.
Calibrating your 3D printer

Before doing anything else, it is best to make sure that your 3D printer has been properly calibrated. This is not something you will need to do for every lithophane project but should be a part of your regular routine nonetheless. A well-calibrated 3D printer gives you the best chance of getting good results from your lithophane print.
The most basic step of calibration is to make sure that your bed is properly leveled. You can do this via manual bed tramming if your print bed is relatively flat. For more distorted print beds, an auto bed leveling procedure using a level sensor will work much better.
You will then also want to calibrate your extruder to avoid issues related to under-extrusion or over-extrusion. More specifically, you want to fine-tune the extruder’s e-step settings so that it extruders exactly the length of filament as the command directed by the slicer. This can be a fairly long process that requires knowing how to manipulate your slicer’s G-Code.
Beyond those two major calibration processes, you will want to make sure that your 3D printer is on a stable surface, all its screws are tightened, and the guide rods for the print head movement are well-lubricated.
Converting an image to a lithophane
Once you have selected an image to turn into a lithophane, you will have to convert it to a 3D model. There are several ways to do this.
Slicer
The most straightforward way is to simply import the image file to your slicer. This should bring up a window that allows you to set the parameters of the 3D model that will be generated. Parameters will vary depending on the slicer you are using, but you will want to pay attention to the settings that control the thickness and contrast of the resulting 3D model. These will determine how well light penetrates the model and how prominent the image’s features will be.
Importing an image to your slicer is probably the easiest way to make a lithophane model outside of using free online tools. It does not take much effort aside from having to do repeated trials to get the look of the lithophane just right.
The downside of this option is that it does not really let you play around with the appearance of the 3D model. It also does not give you a very good preview of how the 3D-printed lithophane will look like.
Photoshop + Blender
If you want a greater degree of control over how the lithophane will look, we recommend using the combo of Adobe Photoshop and Blender. This is a good option if you’re already familiar with how these design platforms are used. If you have to learn how to use it from scratch, then it might be more trouble than it’s worth.
To start, you will want to open your image in Photoshop. You will then want to desaturate the image and posterize it. Posterizing an image converts its color into different shades of gray. This will give you a pretty good idea of how the lithograph will look when printed. To finish, run a median filter on the image to remove tiny dots and specks, making the image look significantly smoother.
You will then need to enable two specific add-ons in Blender:
- Import-Export: Import Images as Planes
- Mesh: 3D Printing Toolbox
On the workspace, delete the default cube, light, and camera. Import the image using the “Import Image as Plane” add-on that you had just activated. Scale the image to the actual size that you want to be in when printed, taking note of the units that you are using currently. Apply the scale to the object so you will not need to worry about different scales when making edits.
With all edges selected, use the Extrusion option and extrude the model to half a millimeter. This will be the base thickness of your lithophane.
You will then want to subdivide the model into a grid. Go to Edit mode, select either the vertical or horizontal edge, press W, and sub-divide. You want each sub-division to be as close to a square as possible, so the number of divisions will largely depend on the dimensions of your image. You will want at least 1000 squares to ensure a smooth gradient later on.

Go to Object mode before the last few steps – applying modifiers. The first modifier is Multiresolution, which will subdivide the model into even smaller portions. Applying this modifier once or twice will massively help in improving the quality of the lithophane.
Before doing the final step, go back to Edit Mode and make sure you are in Vertex selection mode. Draw a box that includes the “front” face of the image and none of the back face. Go to the Vertex Group panel, and create a new group that will include all these vertices.
Lastly, apply the Displace modifier. This will convert the color gradient of the image into a texture gradient, similar to a topographic map. Choose Z as the direction for displacement and “UV” as texture coordinates. Make sure to only apply the Displace modifier to the new vertex group that you created.
You should now have a relief map that was generated using the different shades of grey of the original image. If done right, the back surface of the image should remain smooth and flat.
Online tools
If you do not want to go through the entire process of tweaking your image to get the lithophane just right, you can also just use any of several online tools for turning images into lithophanes. 3DP Rocks and Lithophane Makers are probably the most popular options under this category. The online tools are very easy to use and offer several lithophane shapes.
Slicer settings for lithophanes
Dialing in the best slicer settings for 3D printing lithophanes can be quite tricky, mostly because there are a lot of different opinions on this matter. There is certainly some room to experiment here, and some special considerations apply to lithophanes with fancy shapes, such as circular or heart-shaped ones.
To keep things simple, here are the most important slicer parameters to tweak when printing lithophanes:
Shell and infill
The goal of lithophane printing is to make sure that it is completely solid inside. There are two approaches to this goal that are equally valid depending on who you talk to.
One school of thought is to increase the number of shells to a ludicrously high number – 99 is commonly used. The infill will then be reduced to 0%. This effectively prints the lithophane as a wall.
The second school of thought is to increase the infill to 99% and adjust the number of shells depending on the desired thickness of the lithophane. This still effectively prints the lithophane as a solid block. A value of 100% for the infill is generally not used as this causes a drastic increase in printing time. A rectilinear infill pattern works best for lithophanes.
Layer height
Print with a layer height that is around 0.1 mm. To get the best results, make sure that the layer height value corresponds to the properties of the Z-axis motor and lead screw. In most cases, this rounds up to a value of 0.12 mm.
Print speed

As with many delicate 3D printing jobs, a slow printing speed works best. Anything in the range of 25 to 45 mm/s should work fine, but setting it at a lower value should still be better for preserving detail and avoiding imperfections.
Orientation
This should be fairly intuitive if you have ever seen a lithophane 3D printing job before, but it bears mentioning that you should orient your model vertically. This obviously avoids bed adhesion issues and eliminates any need for support.
Brim
With a vertical print, your lithophane will have very little contact with the print bed. To help keep it stable, it is recommended to print your lithophane with a brim. A line count of at least 10 should work fine, but you can do up to 20 for larger models. You can also use multiple brim layers if your slicer offers this option.
Bed temperature
A heated print bed is recommended for 3D printing lithophanes, even if you’re printing with PLA. However, it is best to keep the bed temperature at the lower end of the recommended range of your filament to avoid heat-induced distortion, although having a brim goes a long way in mitigating this risk.
Best filament for lithophanes
If you’re 3D printing lithophanes, you will want to use a filament that allows light to pass through clearly. For this reason, white PLA is typically the filament of choice for lithophanes. White PETG is a good option as well but might be a bit more difficult to work with.
Any brand of high-quality white PLA filament should be brilliant for printing lithophanes. Some of the brands we can recommend are:
Some people prefer the look of lithophanes made using off-white filament. This is a matter of taste and something you will discover after some trials.
Final thoughts
Lithophanes are some of the best projects you can do with your 3D printers because it surprises and appeals to so many people. Need a last-minute wedding or housewarming gift? Get a good photo of your friends or loved ones and turn it into a lithophane for a gift that is both long-lasting and unforgettable.
3D printing lithophanes is actually quite simple. It is the process of converting an image into a 3D model that takes a bit of practice. Fortunately, there are now easy-to-use online tools that can help in this matter.
The post Best Settings for 3D Printing Lithophanes appeared first on 3D Insider.


Leave a Comment